

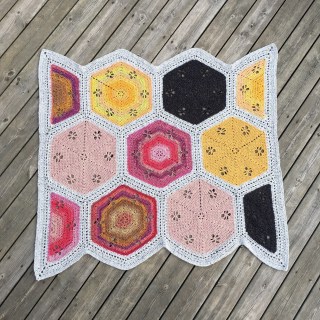
MATERIAL
Yarn used: Scheepjes Secret Garden (20% Silk, 20% Cotton, 60% Polyester)
I used almost 11 balls for my blanket. 1 ball = about 93 m.
Colors and amount of balls used are:
4 x 736 (Bird Bath),
2 x 735 (Wishing Well),
1 x 705 (Rambling Blooms),
1 x 707 (Summer House),
1 x 706 (Falling Blossom),
1 x 734 (Picket Fence)
Hook: 4 mm
SIZE
ABBREVIATIONS, US CROCHET TERMS
ch – chain
tr – treble crochet
BLO – back loop only
** – repeat instructions between stars the amount of times specified
[] – repeat instructions between brackets the amount of times specified, this is a lower level repeat than the **
() – instructions inside the parenthesis are made in the same st/ch
Add this project to your Ravelry queue!
DESCRIPTION
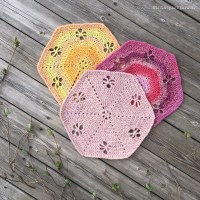
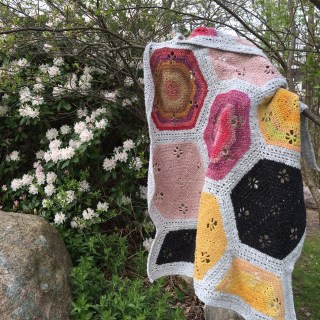
The blanket is built up by 7 hexagons, 4 half hexagons, padding rounds in between and a border.
HEXAGON AND HALF HEXAGON
The hexagon and half hexagon pattern is found in one of my earlier projects:
Make 7 hexagons in colors:
2 of 735 (Wishing Well),
1 of 705 (Rambling Blooms),
1 of 707 (Summer House),
1 of 708 (Rose Arch),
1 of 737 (Shady Courtyard),
1 of 734 (Picket Fence).
1 of 708 (Rose Arch),
1 of 705 (Rambling Blooms),
1 of 707 (Summer House),
1 of 737 (Shady Courtyard).
PADDING
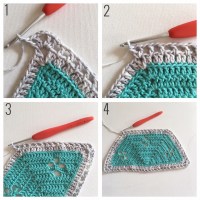
Padding for hexagon
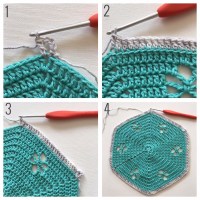
Round 2
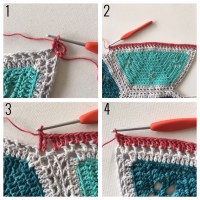
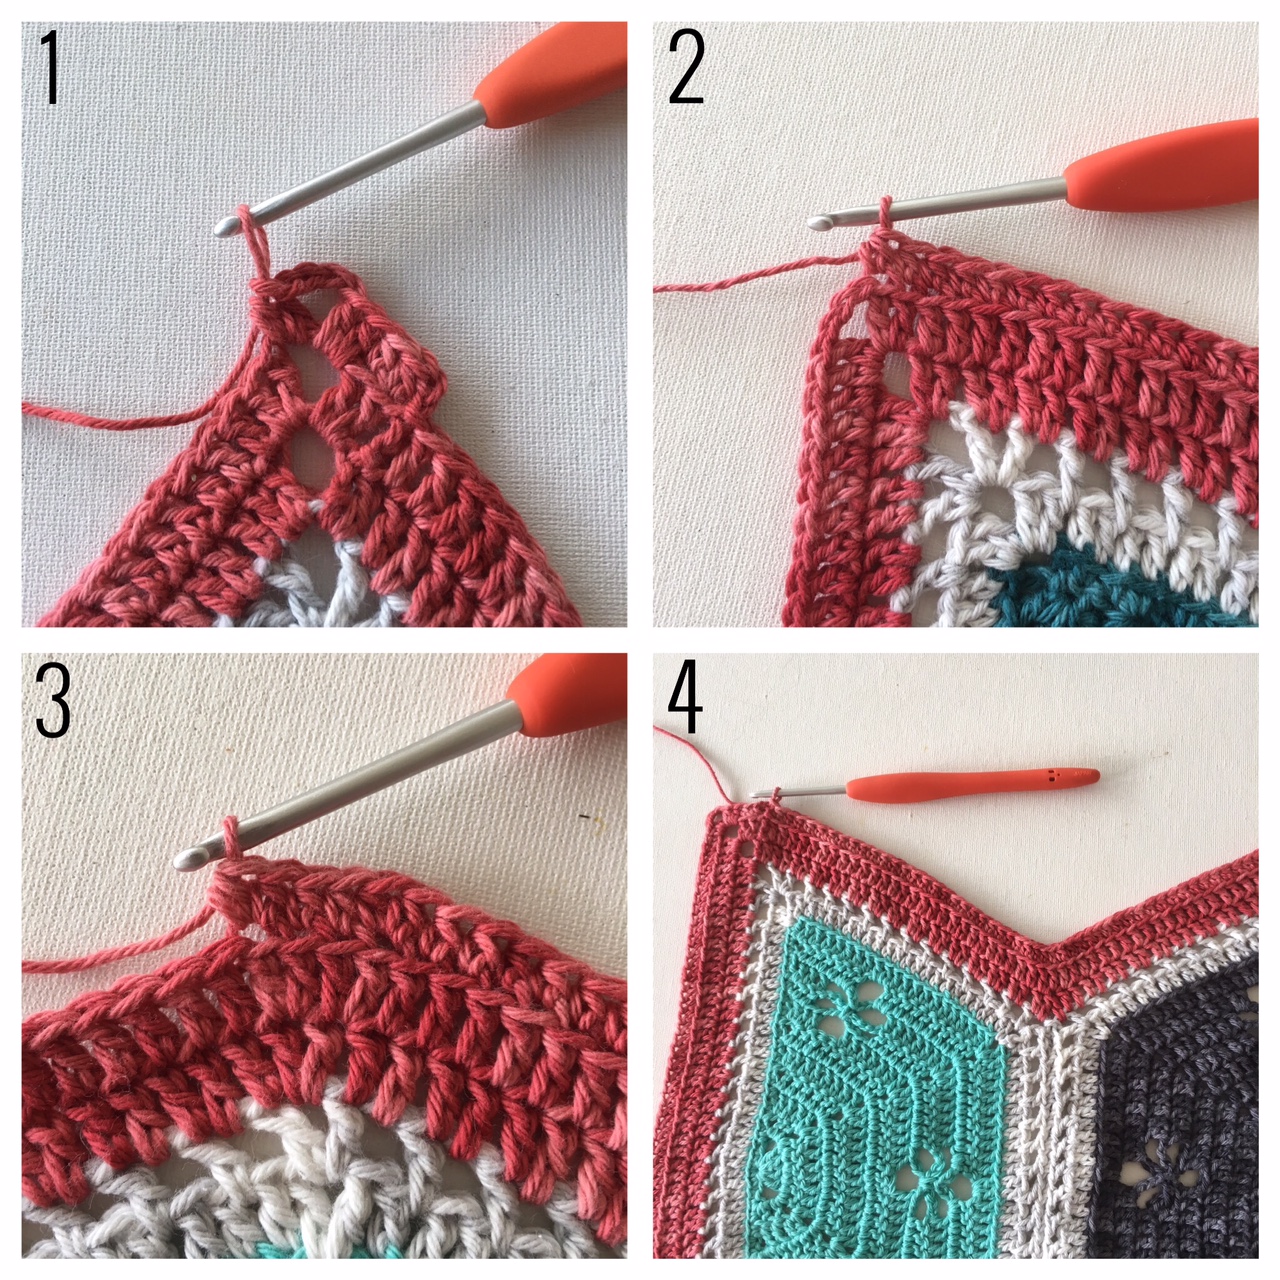
Sl st into next ch-1 sp. Ch 4, dc in ch-1 sp (image 1), * [ch 1, dc in between st 2 and 3 ahead (image 2)] until next ch-1 sp (image 3), (dc, ch 1, dc) in ch-1 sp *Repeat from * to * 6 times, omitting the last (dc, ch 1, dc).Join to the 3:rd st of the beginning ch-4 with a sl st (image 4).
Fasten off and weave in ends.
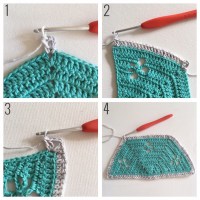
Padding for half hexagon
Start in ch-1 sp on side which end with a ch-3 sp. Ch 4, dc in ch-1 sp (image 1), *dcin each st (BLO!) until ch-3 sp (image 2), (2 dc, ch 3, 2 dc) in ch-3 sp (image 3)*repeat *to* 2 times.
*dc in each st (BLO!) until next ch-1 sp, (dc, ch 1, dc) in ch-1 sp*repeat *to* 2 times omitting the last (dc, ch 1, dc).
Join to the 3:rd st of the beginning ch-4 with a sl st (image 4).
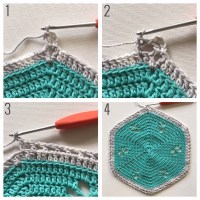
Round 2
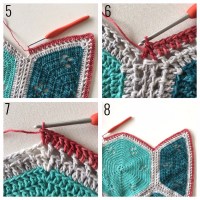
Sl st into next ch-1 sp. Ch 4, dc in ch-1 sp, * [ch 1, dc in between st 2 and 3 ahead] until next ch-3 sp, (2 dc, ch 3, 2 dc) in ch-3 sp (image 1)*repeat *to* 2 times.
* [ch 1, dc in between st 2 and 3 ahead] until next ch-1 sp, (dc, ch 1, dc) in ch-1 sp (image 2 and 3)*repeat from * to * 2 times, omitting the last (dc, ch 1, dc).
Join to the 3:rd st of the beginning ch-4 with a sl st (image 4).
Fasten off and weave in ends.
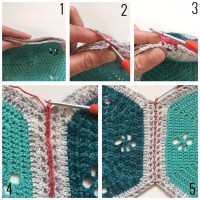
JOINING
Joining method:
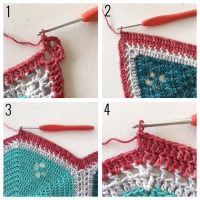
ch 1 and sc in the next ch-1 sp (image 4 and 5).
BORDER
Side A
(Ch 6, 2 dc) in the ch-3 sp, * [dc in next st, dc in next ch-1 sp] repeat [to] until next ch-1 sp (image 5), dc2tog (one leg in each of the next ch-1 sp’s, (image 6)) [dc in next st, dc in next ch-1 sp] repeat [to] until next ch-1 sp, 2 dc in ch-1 sp (image 7) * repeat *to* until last ch-3 sp on side B.
Repeat side A and side B once. Make 1 dc in next ch-3 sp. Join to the 3:rd st of the beginning ch-6 with a sl st.
Side B
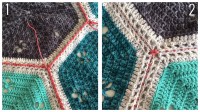
(2 dc, ch 3, 2 dc) in the ch-3 sp, *dc in each st until the top of a hexagon (image 3 above),2 dc in each of the next 2 st’s (the dc’s made in the ch-1 sp on previous round (image 4 above))*
repeat *to* until last hexagon top. Dc in each st until last ch-3 sp on the side.
Side B
(2 hdc, ch 3, 2 hdc) in the ch-3 sp, hdc in each st until next ch-3 sp but add 2 extra hdc’s on the top of each hexagon (i.e. increase by 1 hdc each in any 2 st’s on each hexagon) (image 3 above).
I put a lot of work into my patterns so if you use them and share images on social media I would be very happy if you share a link to my blog and tag your work by #intheyarngarden (or #springgardenhexieblanket for this blanket). That makes it easier for me to see your creations which I’d love to see 🙂
Happy crocheting!
© Copyright In the Yarn Garden 2017. All rights reserved.
Any redistribution or reproduction of part or all of the contents of this pattern in any form is prohibited without permission from In the Yarn Garden. You are though very welcome to link to this site. You can sell items made from my patterns, please credit In the Yarn Garden as designer. You can not use my patterns or pictures for any kind of advertising.

Just wanted to let you know how much I love this pattern and even though the writing part was tough for you I think you did an excellent job.
LikeLike
Hi Gail!
I’m very happy to hear that you like the pattern. Hearing things like this gives me energy to write more patterns 🙂 Thank you!
LikeLike