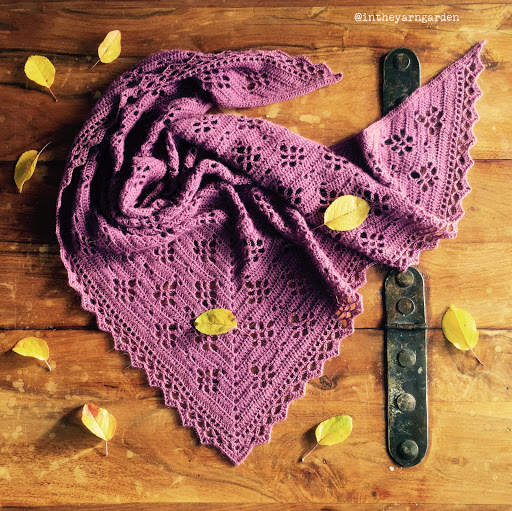
I’m really not a shawl person. I’m wearing mine as a scarf/shawlette instead (you can find an image of me wearing mine further down )but the great thing with this pattern is that you easily can make it as big as you want just by adding some more rows.
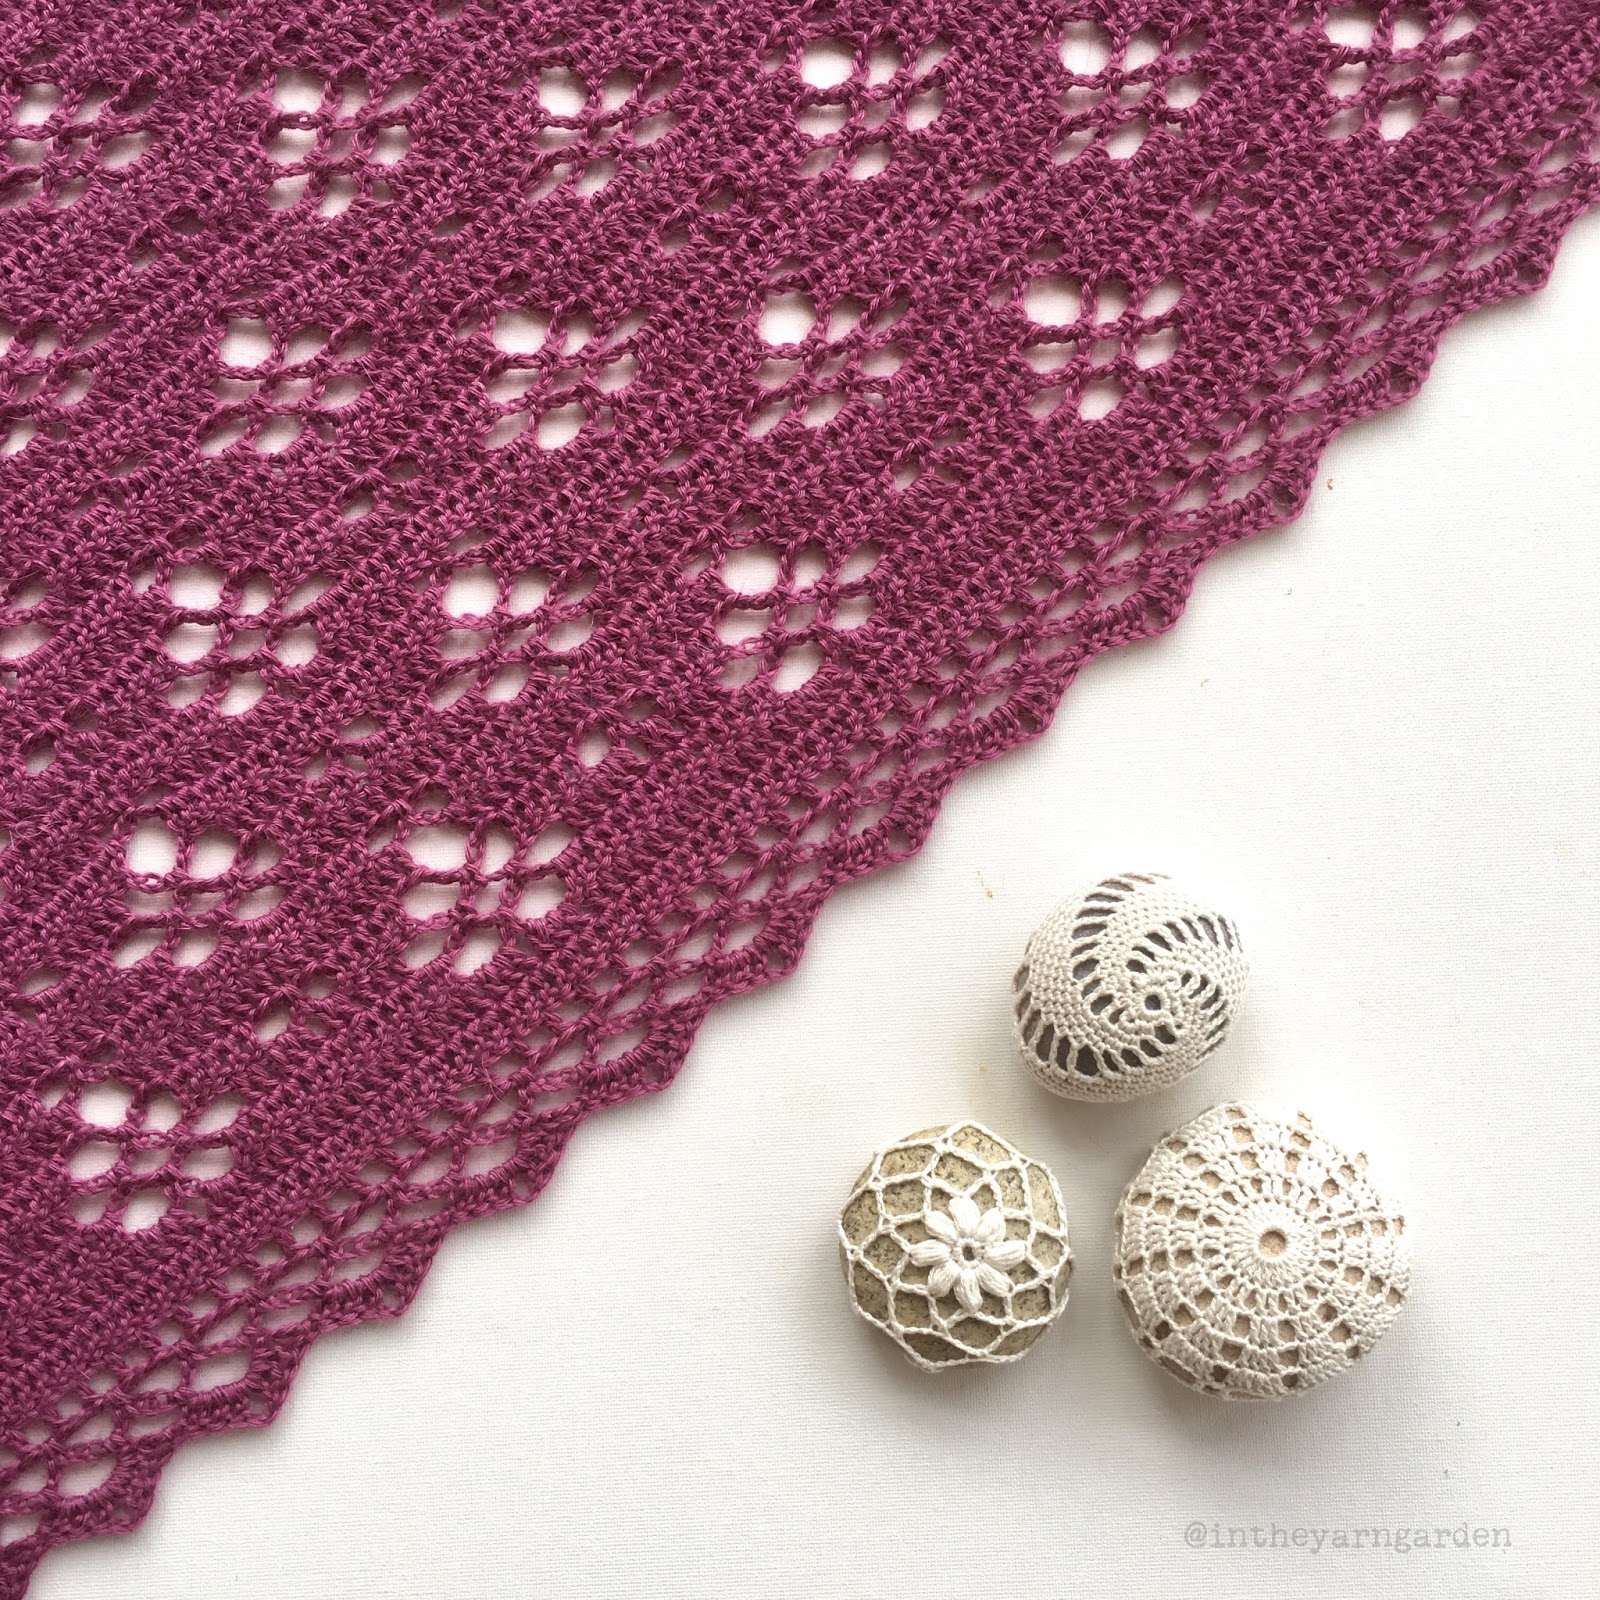
At a first glance the pattern might look very complex but as soon as you have come through the first repetition I’m sure things will move on more smoothly.
The yarn used in this pattern was sponsored by Järbo Garn .
MATERIAL
Yarn: Llama Silk (70% Baby Llama Soft, 30% Mulberry Silk)
I used almost 4 skeins for my shawl. 1 skein = about 165 m.
Hook: 3,5 mm
Note: I have used another yarn for the tutorial images to make it easier to see the stitches.

ABBREVIATIONS, US CROCHET TERMS
ch – chain
hdc – half double crochet
dc – double crochet
top ch – the top ch of the ch-3 made first at previous round
sp – space
** – repeat instructions between ** along the side
Add this project to your Ravelry queue!
DESCRIPTION
General information
- To prevent the edge from curling crochet very loose on the first ch 3 on each round or maybe even ch 4 instead.
- Turn your work after each round.
- All rounds (except round 1) of the base pattern starts with a (ch-3, 2 dc) in the first st and ends with 3 dc’s in the 3:rd ch of the beginning chain from previous round.
- The larger hole patterns are referred to as “Mulberry pattern“
BASE PATTERN

Start with a magic ring.
Round 1:
(Ch 3, dc, ch 3, 2 dc) in the magic ring. (image 1)

Round 2:
ch-3 (image 1), 2 dc in next st (image 2),
dc (image 3), (2 dc, ch 3, 2 dc) in corner ch-3 (image 4) , dc,
3 dc’s in top ch .

Round 3:
ch-3 (image 1), 2 dc in next st,
5 dc (image 2), (2 dc, ch 3, 2 dc) in corner ch-3 (image 3), 5 dc,
3 dc’s in top ch (image 4).

Round 4: (In this round we start on our first mulberry patterns)
ch-3, 2 dc in next st, 2 dc,
3 dc (image 2, only 1:st of 3 dc’s in image), (2 dc, ch 3, 2 dc) in corner ch-3, 3 dc,
2 dc (image 3, only 1:st dc in image), 3 dc’s in top ch (image 4).

Round 5:
ch-3, 2 dc in next st, 4 dc, dc in ch-3 sp (image 1), ch 5, dc in ch-3 sp (image 2),
5 dc, (2 dc, ch 3, 2 dc) in corner ch-3, 5 dc,
4 dc, 3 dc’s in top ch (image 3).

Round 6:
ch-3, 2 dc in next st, 5 dc (image 1), ch 4, sc in ch-5 sp (image 2), ch 4, sk 2 st’s (image 3),
6 dc, (2 dc, ch 3, 2 dc) in corner ch-3, 6 dc,
5 dc, 3 dc’s in top ch (image 4).

Round 7:
ch-3, 2 dc in next st, 5 dc (image 1),
6 dc, (2 dc, ch 3, 2 dc) in corner ch-3 (image 3), 6 dc,
ch 4, sc in next ch-4 sp, ch 4, sc in next ch-4 sp, ch 4, sk 2 st’s,
5 dc, 3 dc’s in top ch (image 4).

Round 8:
ch-3, 2 dc in next st, 7 dc,
8 dc, (2 dc, ch 3, 2 dc) in corner ch-3, 8 dc,
2 dc in next ch-4 sp, ch 4, sc in next ch-4 sp, ch 4, 2 dc in next ch-4 sp,
7 dc , 3 dc’s in top ch (image 4).

The repetitive part of the base pattern contains of round 9-13 below!
Instructions inside ** is repeated as many times as needed along the side until you meet the repeat requirement stated afterwards.
!! Note that the repeats ends in the middle of the instructions between ** !!
So this means that the first time you make round 9-13 you will repeat instructions inside ** 1.5 times, the second time you make round 9-13 you will repeat them 2.5 times, etc…
Round 9: In this round we start new mulberry patterns and finish the old ones.
ch-3, 2 dc in next st, 2 dc,
*ch 3, sc between st 2 and 3 ahead, ch 3 (image 1), sk 2 st’s, 5 dc, 3 dc in next ch-4 sp (image 2), 3 dc in next ch-4 sp , 5 dc* repeat until 3 st’s left to corner ch-3,
*ch 3, sc between st 2 and 3 ahead, ch 3, sk 2 st’s, 5 dc, 3 dc each in next 2 ch-4 sp, 5 dc*
repeat until 3 st’s left, 2 dc, 3 dc’s in top ch (image 4).

Round 10:
ch-3, 2 dc in next st, 4 dc,
*dc in ch-3 sp, ch 5, dc in ch-3 sp (image 1), dc in each st until next ch-3 sp (image 2)*
repeat until 5 st’s left to corner ch-3,
repeat until 5 st’s left, 4 dc, 3 dc’s in top ch (image 4).

Round 11: In this round we make the small hole patterns in between the mulberry patterns
ch-3, 2 dc in next st, 5 dc (image 1),
*ch 4, sc in ch-5 sp, ch 4 (image 2), sk 2 st’s, 5 dc (image 3), ch 3, sc between st 2 and 3 ahead, ch 3 (image 4), sk 2 st’s, 5 dc (image 5)* repeat until 6 st’s left to corner ch-3,
*ch 4, sc in ch-5 sp, ch 4, sk 2 st’s, 5 dc, ch 3, sc between st 2 and 3 ahead, ch 3, 5 dc*
repeat until 6 st’s left, 5 dc, 3 dc’s in top ch (image 6).

Round 12:
ch-3, 2 dc in next st, 5 dc,
*ch 4, sc in ch-4 sp, ch 4, sc in ch-4 sp, ch 4 (image 1), sk 2 st’s, 3 dc (image 2), 2 dc each in next 2 ch-3 sp (image 3), 3 dc (image 4)* repeat until 6 st’s left to corner ch-3,
*ch 4, sc in ch-4 sp, ch 4, sc in ch-4 sp, ch 4, sk 2 st’s, 3 dc, 2 dc each in next 2 ch-3 sp, 3 dc*
repeat until 6 st’s left, 5 dc, 3 dc’s in top ch (image 6).

Round 13: ch-3, 2 dc in next st, 7 dc (image 1),
*2 dc in next ch-4 sp (image 2), ch 4, sc in ch-4 sp, ch 4, 2 dc in ch-4 sp (image 3), dc in each st until ch-4 sp (image 4)* repeat until 8 st’s left to corner ch-3,
*2 dc in ch-4 sp, ch 4, sc in ch-4 sp, ch 4, 2 dc in ch-4 sp, dc in each st until ch-4 sp*
repeat until 8 st’s left, 7 dc, 3 dc’s in top ch.

Repeat round 9-13 as many times as you want and finish off the base pattern by making one last round 9.On the last repeat of round 9 you should skip the start of new mulberry patterns (i.e the (ch 3, sc between st 2 and 3 ahead, ch 3)) and just make dc’s there instead.
Let’s go on with the edge!
EDGE
Round 1: One round of dc’s
Ch 3, 2 dc in next st, dc in each st until corner ch-3 sp, (2 dc, ch 3, 2 dc) in the ch-3 space, dc in each st until 1 st’s left, 3 dc’s in top ch.

Round 2:
Ch 4, dc in next st (image 1),
*ch 1, sk 1 st, dc* repeat until a dc is made in the second st before the corner ch-3 sp (image 2),
ch 1, (2 dc, ch 3, 2 dc) in the ch-3 space (image 3),
*ch 1, sk 1 st, dc* repeat until a dc was made in the second st before the last st (ch-3),
(dc, ch 1, dc) in top ch (image 4).

Round 3:
*ch 5, sc in the second next ch-1 sp (image 3)* repeat until a sc was made in the 2:nd ch-1 before corner ch-3 sp,
ch 5 (image 4), sc in the second dc made in the corner ch-3 on previous round (image 5), (dc, ch 3, dc) in the ch-3 space, sc in next st (image 6),
*ch 5, sc in the second next ch-1 sp* repeat until a sc was made in the last ch-1 st before the last st (ch-3) (image 7),
(ch 3, dc) in the top ch (image 8).

Round 4:
Ch 6, sc in next ch-3 sp (image 1),
*ch 5, sc in next ch-5 sp* repeat until a sc was made in the last ch-5 before the corner ch-3 sp (image 2),
ch 5, (sc, ch 3, sc) in the ch-3 space (image 3),
*ch 5, sc in next ch-5 sp* repeat until your sc was made in the last ch-6 sp,
(ch 3, dc) in the top ch (image 4).

Round 5:
Depending on how many times you repeated the base pattern you could end up with 2 different solutions on this round. If you’ll get an extra ch-5 left before the corner ch-3 make 4 dc’s in it and also 4 dc’s in the first ch-5 after the corner ch-3 sp.
(sc (image 1), 3 dc, ch 2, 3 dc) in first ch-5 sp (image 2),
* sc in next ch-5 sp, (3 dc, ch 2, 3 dc) in next ch-5 sp (image 3)* repeat until a sc was made in the last ch-5 before the corner ch-3 sp,
(3 dc, ch 2, 3 dc) in the ch-3 space (image 4),
* sc in next ch-5 sp, (3 dc, ch 2, 3 dc) in next ch-5 sp* repeat until the last but one ch-5 sp,
sc in last ch-5 sp (image 5).

UPPER EDGE
I have added some extra rows along the upper edge to make it prettier and more comfy against the neck.
Round 1: Do not turn your work for this round!!
ch 7, 3 hdc in next ch-3 sp (image 1), make 2 hdc for each round along the upper edge (image 2), 3 hdc’s in last ch-3 sp (image 3), ch 4, dc in first st from last round of edge (image 4).

Round 2: Turn your work! Work this round in front loop only (FLO)!!
4 hdc’s in last ch-4 sp (image 4).

Round 3: Turn your work!
ch 1, sc in each st along.

Fasten off and weave in the ends! Your Mulberry Wine Shawl is finished! 🙂

I put a lot of work into my patterns so if you use them and share images on social media I would be very happy if you share a link to my blog and tag your work by #intheyarngarden (or #mulberrywineshawl for this shawl). That makes it easier for me to see your creations which I’d love to see.
Happy crocheting!

You do such lovely work.
LikeLike
Thank you! 🙂
LikeLike
Good morning , I’m holding you can help sometimes I just get stuck in starting would you have a YouTube video at could start I know I must sound well stupid but i’m so sorry to ask …thank you Ellen PS this beautiful shawl is for my Priest’s Mother who is very sick so when finished Father Kenny will Bless and it will become a Prayer Shawl I hope you don’t mind me telling you …
LikeLike
Hi! No questions are to stupid to be asked. I’m sorry but there is no YouTube video available that I’m aware of. Unfortunately I don’t have time to make any either. I hope that you find your way somehow.
LikeLike
Hello, this is a lovely pattern that I would like to make…
in Rnd 5 it reads in part
* sc in next ch-5 sp, (3 dc, ch 2, 3 dc) in next ch-5 sp* repeat until the last but one 5-lmb,
My question is, What is ‘one 5-lmb’?
LikeLike
Hi there!
It’s supposed to say ch-5 space. I guess I missed it in the translation from the Swedish version 🤭☺️. Thanks for finding that error! I will correct it.
LikeLike
What a gorgeous pattern! I can’t wait to make this. Thank you so much for generously making this available for free, and for your excellent step-by-step photos! ❤️
LikeLike
Thank you!
LikeLike
Hi 👋
I’ve tried and tried but no matter what I do I only get 16 dc between Mulberry patterns on row 10
I can’t get 18.
Ive gone back and row 9 is right, I don’t know what I’m doing wrong 🙈
LikeLike
Hi there! Sorry to hear that you have a problem with that row. It’s hard for me to help out without seeing your work. If you could send me a close up of your work to intheyarngarden@gmail.com I will look at it and try to see what’s going wrong 😊
LikeLike
Another stupid question! At the very start you have 2 dcs chain 3 2 dcs. Then next you turn, chain 3, 2 dcs in the next stitch then dc. Where do you put the next dc? After chaining 3 you only have 1 dc to put the 2 dc’s. I hope this make sense. I am a beginner! Thank you!
LikeLike
After chaining 3, make the first 2 dcs of round 2 in the last dc of round 1. Then you’ll make the single dc in the next dc (Which would be the second last dc of round 1.). After that you’ll make 2 dcs around the ch-3 from round 1. Then chain 3 and make 2 more dcs around the ch-3 from round 1. Take a look at the image showing the steps of round 2.
Cheers,
Charlotta
LikeLike
Also, round 4 says sc between st. 2 and 3 ahead. Could you explain?
Thank you again!
LikeLike
Ho there! Sorry for my late answer. This means skip 2 stitches and make a sc not in the next stitch but in between the second skipped stitch and the next stitch. I hope that answer made it clearer? 🙂
LikeLike
love your design!!! can’t wait to make it!!!
LikeLike